How to invite users to your Voucher Connect account

A guide on how to give staff access to your Voucher Connect dashboard and app.

Giving your staff different access to your Voucher Connect account is a great way to keep track of what’s going on and to make sure only the necessary details are shared with each staff member.

Let me show you how to do this..

  • Head over to your Voucher Connect dashboard.
  • Click Settings – General Settings from the main menu.
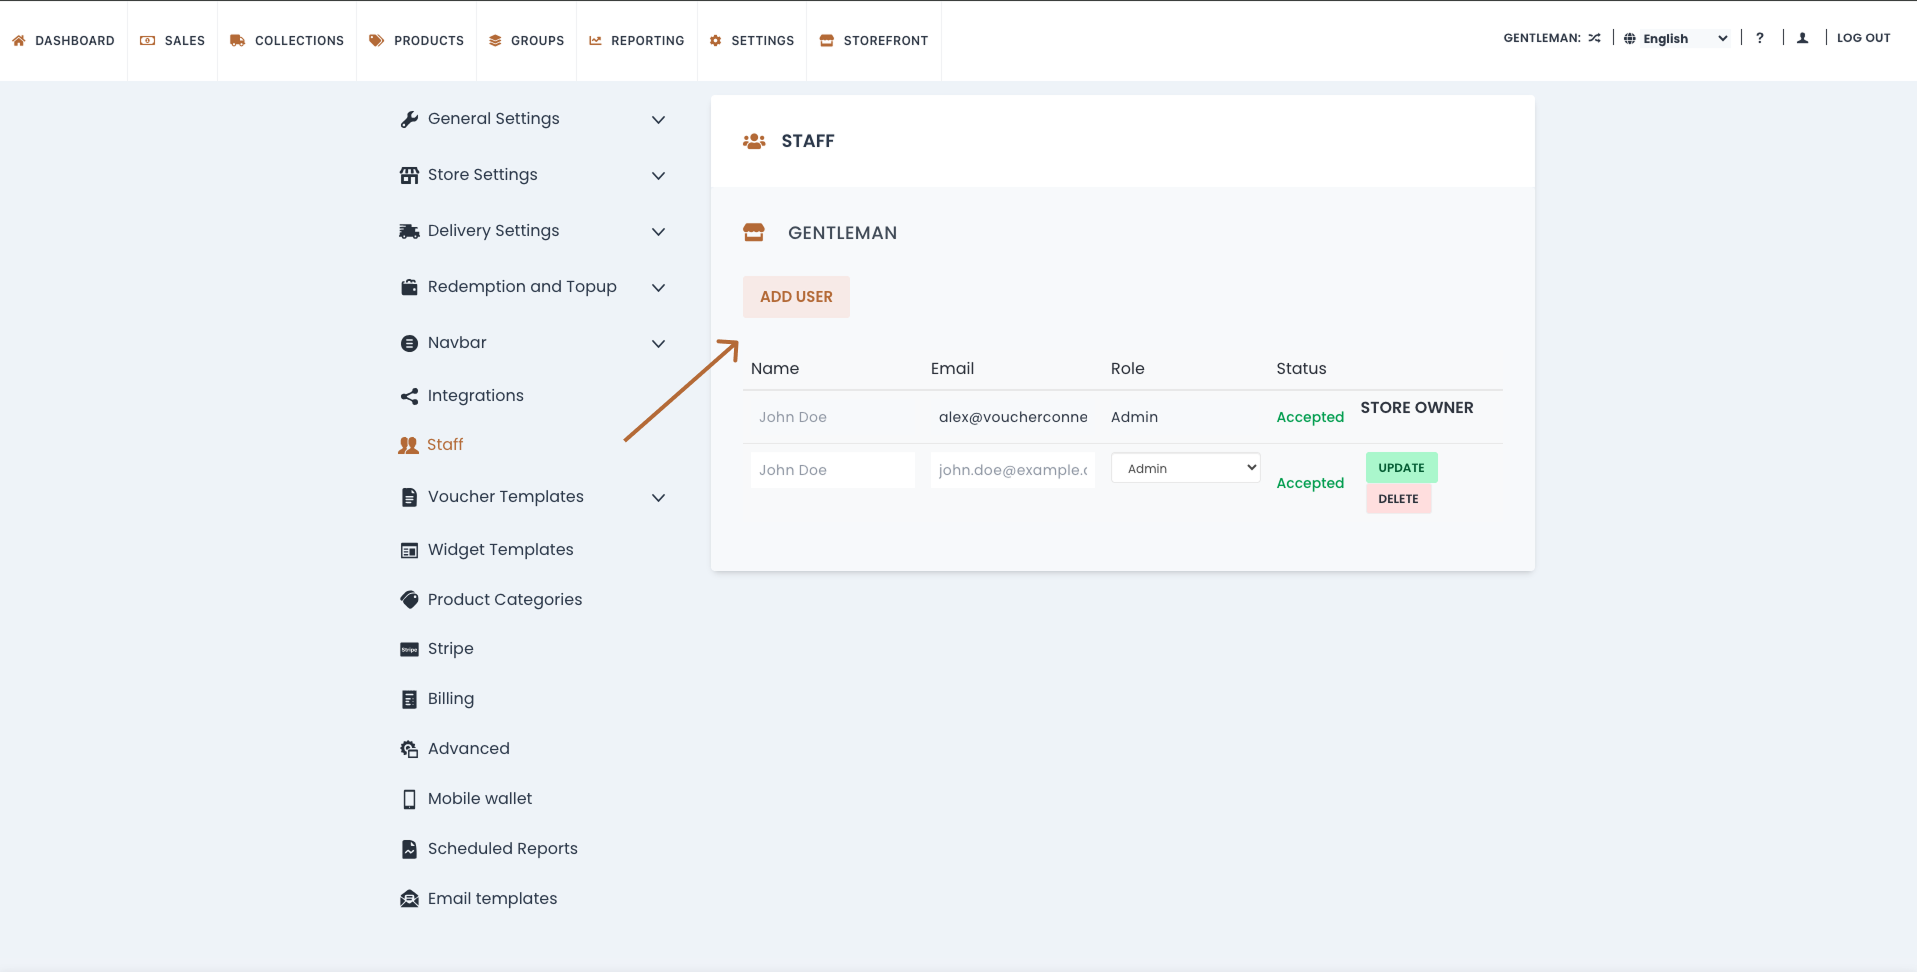
  • From here scroll down and click on Staff.

Here you can see all the staff login emails and what access (role) they have:


You might be wondering what each role means, let me explain..

Admin – This gives full access to the dashboard.

Manager – Access to sales, reporting, redeeming and selling.

Redeemer – Only able to redeem vouchers.

Redeem & Sell – Only able to redeem and top up vouchers for sale in-store.

  • Once you have decided on what access to give each staff member, you can click Add User.
  • A pop up will appear asking for Email, Name and Role.
  • Click Invite. This will send the staff member an invite email to the Voucher Connect account.
  • From this invite, they can set a password and use this as their login for the Voucher Connect App or dashboard.

And that’s all there is to it! You will now be able to view all Redemptions and Top up detailsfrom the Reporting tab on the main menu.


If you have any questions, just let us know. We’re always here and happy to help 😊

110 views

How to require 3D Secure Authentication on all payments from supported cards.


3D Secure authentication is an additional fraud prevention step which is added to the checkout process.

Note: Please bear in mind that some customers find 3D secure authentication to be frustrating, and some people may not complete the checkout process if 3D secure authentication is required.  

To set your Voucher Connect store to require 3D Secure authentication for all payments on your store, you’ll need to log into your Stripe dashboard.  Once you get in to your dashboard, over on the right sidebar you’ll see a button labeled Radar.


If you click on that button, it will open a sub-menu where you can find another button called Rules. Click on that to open the rules panel. 


At the top of the rules panel you’ll see the 3D secure controls. By default, 3D secure authentication is only requested when Stripe estimates the risk level is highest. 

If you would prefer to require 3D secure authentication on all payments made with supported cards, then click on the triple-dot menu button on the row that says Request 3D Secure if 3D Secure is supported for card. Click Enable to switch it on.  


A popup will appear, asking you to confirm your decision. Click the Enable button to proceed. 

That’s all there is to it, you can close your Stripe dashboard whenever you’re ready, and your customers payments will route through 3D Secure authentication when its available on their card.

96 views

How to set my delivery options


Here we will go through the different delivery options for your gift vouchers.

It’s great to give your customers several different options when it comes to delivery of your gift vouchers. Let’s go through the different options first..

  • Print Voucher – If a customer wants to print a voucher off straight away, this is a great option. We will also email the voucher to them so they have it on file.
  • Email Voucher – We will email the voucher to the purchasers email address or the customer has the option to email the voucher straight to the recipient.
  • Scheduled Email Voucher – This is a great option allowing customers to decide when a gift voucher is emailed to the recipient. Especially handy on special occasions, such as Birthdays or Christmas.
  • Postal Delivery – Choosing postal delivery allows customers to order a beautifully branded physical gift card, that can be posted to their own address or the recipients address. You have 2 options here for postal delivery:
  1. Posted from Voucher Connect – We print the gift card on demand and posts it to the customer or recipient in IRL or UK for a charge of €5 to the customer (absorb some or all of this fee using the toggle in Postal Dispatch Settings). All gift cards are sent with a gift envelope and details slip.
  2. Posted from you – You can choose to look after your own postal delivery if you have stock of physical gift cards in store at a cost to the customer, chosen by you. Once you receive a notification of a physical card order, you can load a physical gift card and post it to the customer. Pop over to our help article on loading physical gift cards here – http://help.voucherconnect.com/en/articles/5652360-how-to-load-a-voucher-on-the-mobile-app
  • Click and Collect – This gives the customer the option to pick up their gift card order in store. Similar to above, you will get a notification of a voucher sale, load the voucher in store and get it ready for the customer to pick up.

All postal (in-store) and click and collect order details will appear in the Collections tab on your Voucher Connect dashboard under Order to be prepared. Once you have your gift ready for collection, you can click the Ready to Collect button, which will send your customer a notification email letting them know that they can come in to collect their gift.


You want to turn certain delivery options on or off, no problem. Let me show you how..

  • Pop over to your Voucher Connect dashboard.
  • Click SettingsGeneral Settings.
  • Next click Delivery Options from the left hand menu. Here you will be able to choose the delivery options you wish to offer your customers.
  • Click Save, and you’re good to go.

If you have any questions, we’re here and always happy to help 😃

149 views

How to Enable CVC Verification

Sometimes, Stripe will allow a payment to go through even when the CVC was entered incorrectly, but you can set it to require a correct CVC.

To set your Voucher Connect store to require CVC verification for all payments on your store, you’ll need to log into your Stripe dashboard.  Once you get in to your dashboard, over on the right sidebar you’ll see a button labeled Radar.


If you click on that button, it will open a sub-menu where you can find another button called Rules. Click on that to open the rules panel. 


In the middle of the rules panel, there is a pane with the title: Then, when should a payment be blocked?

The third option in this pane is: Block if CVC verification fails, which is disabled and greyed out by default. To enable it, click on the tripe-dot menu button on that row, and click Enable. 


A dialog box will pop up, asking you to confirm your decision. Click the Enable button to proceed.

Once you’ve done that, all payments will be blocked if they don’t have the correct CVC code entered.  You can close your Stripe dashboard whenever you’re ready. 

231 views

How to Customise Imagery on Online Storefront

In this article we show you how to upload or update the imagery on your storefront.


You’ve signed up to Voucher Connect and now you can update your storefront with your branding and imagery. How exciting, let me show you how..

Here’s a handy guide on image dimensions, to help you choose the perfect images for your storefront:

Voucher Logo – 1280 x 1280px

Product Image – 1280 x 1280px

Background Image – 1920 x 1080px


Let’s get started..

  • Pop over to your Voucher Connect dashboard
  • Click Settings – General Settings

First up is your Voucher logo. This is your main store logo that will appear on the header and footer of your storefront.

This logo needs to be 1280 x 1280px. You can play around with the logo size using the toggle below the image. Once you make a change, click Save and you can view the changes made by clicking Storefront from the main menu.

Next up is your Background image.


This is the large image that sits below the header. This image needs to be 1920 x 1080px. Keeping in mind that this image scales depending on what device you are viewing it on.

You can use an image from your business or search through our image library.

  • From here you can also change your store header colour.

It looks great when the header is set with a brand colour that compliments your logo.

You can enter the colour HEX code to get the perfect match 😃


The Product image is up next.

These are the images that will appear on your storefront for each voucher product. To load these head back to your dashboard and click Products from the main menu.

  • From here you can click on the Edit button to edit any product.
  • Click Next on the voucher details page to get to the Image section.

You can upload your own image here with dimensions of 1280 x 1280px or you can choose from our image library.

  • Once you’re happy with your image, click Save & Exit.

That’s all there is to it!

If you would like us to give you a hand getting your images uploaded, that’s no problem. You can give us a shout, we’re always happy to help 😃

136 views

Get A Demo

Leave your name, phone number and email address and we will be in touch to arrange a demo.

Boost revenue by 62% ?

The gift card solution that costs less and delivers more