How to Connect your Stripe account


Connect your Stripe account to enable automatic payouts.
Once Stripe is connected, every time a voucher is sold, Voucher Connect automatically transfers the funds over to your Stripe account. Stripe will then pay out to your bank account.


Connecting your Stripe account to Voucher Connect


Head over to your Voucher Connect dashboard and click on the Settings button in the top menu. 

Next, select “Stripe Settings” on the bottom left hand menu and click on the Connect with Stripe button.

That will bring you over to Stripe, and you’ll see a page that looks like this:


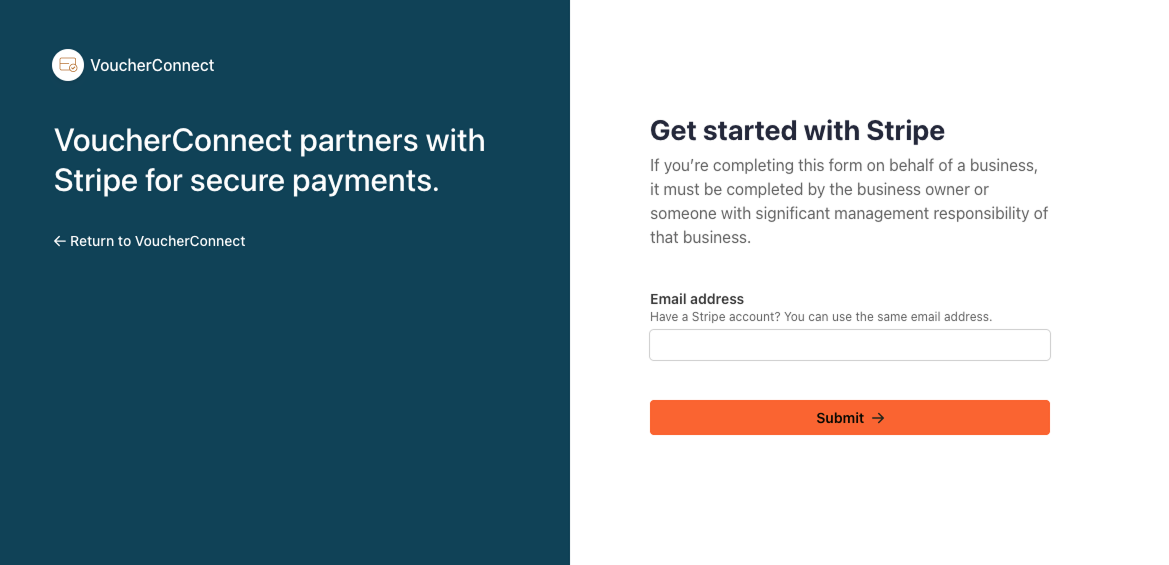
Follow the steps on that page, and then you’ll be redirected back over to Voucher Connect.

Finished

That’s all there is to it, your account should be connected now, and Voucher Connect will display some information about the connected account in the Stripe Settings section. 

Now that you’ve connected your Stripe account, every time you sell a voucher on Voucher Connect, the funds will immediately transfer to your Stripe account, and then pay out to your bank account within 2-3 days. 

If you have any more questions, we are always here to answer them via the chat function on the bottom right of your screen. 

409 views

Perhaps you have a white logo that looks great on a black background, but it’s hard to see on the voucher itself. Changing it is easy.

If you’d like to use a different logo on your vouchers to the one that you use on your storefront, you can change it like this:

Pop over to your dashboard and click on SettingsGeneral Settings and then click on the Voucher Templates tab from the left hand menu.

Scroll to Voucher Logo. Here you can either click on the upload box to upload an image or drag your desired voucher image onto the box. 

After you’ve added your image, you can use the toggle to adjust the size of your logo if necessary.

Click Apply. You can preview how your logo will look in the Voucher Preview section.

Once you’re happy with how it looks, scroll down to the bottom of the page and click Save Settings.

Please bear in mind that there is a 4MB limit on the size of images you can upload here and our recommended dimensions are 1280px x 720px

If you need a hand with anything, just let us know. We’re always happy to help 😃

113 views

How To Sell On-Premise Gift Cards from the Dashboard


We’ll show you how to process vouchers through In-Store Sales on your dashboard.

You might want to process an email voucher to a customer or load a physical gift card in store, In-Store Sales is your guy!

All payments for vouchers through In-Store Sales must be processed separately. This gives you the option to process a voucher without taking payment, to give to a lucky competition winner for example.

  • Pop over to your Voucher Connect dashboard
  • Click on In-Store Sales from the left hand menu.


  • From here you will be able to see your voucher storefront in On Premise Sales mode.
  • Select the voucher you are looking for to create a new voucher
  • Pop in the voucher details and enter the destination email address you want to send the voucher to.
  • Click Generate.


<img src="Destination.jpg" alt="">


  • If you want to top up a physical gift card, you can choose Top Up from the On Premise Sales page.
  • Enter the gift card voucher code and click top up.

And that’s it, your voucher has now been processed.

If you need a hand with anything, we’re here and always happy to help 😊

146 views

How to change between accounts

Manage all your stores under the same Voucher Connect login

Here we show you how to change between multiple stores and manage them without having to login to separate Voucher Connect accounts.

To use this feature, you must have access to all of the stores you are looking to change between.

  • Login to your Voucher Connect account.
  • From the top main menu on the dashboard, you will see your store name to the right hand side.
  • Click on your store name and a dropdown will appear.
  • The dropdown will show all the stores you have access too.
  • You can change between stores by clicking the store you wish to view from the dropdown menu.

And that’s all there is to it 😊

You can also add new stores from here by clicking Add Store to start creating and managing a new store.

If you have any questions, just let us know. We’re always happy to help 😃

225 views

How To Order Physical Gift Cards and Packaging


Ordering physical gift cards, boxes and wallets.

With Voucher Connect you can now order everything you need to enhance your in-store gift card sales. Cards, Boxes, Carriers, Bags and more. You can pop over to our online store to take a look and I’ll take you through the ordering process..

Your first step is Branded Gift Cards. These are a super way to promote your brand through your customers.

You can order quantities of 50-2000 cards online but you can get in touch with us for bespoke pricing, if you want to print larger quantities.

Our in house design team will be in touch with you with a card design proof when your order is complete to confirm the card design before print.

If you would like a card design proof before you place your order, that’s no problem – we can get that sorted for you 😊

Sample card design proofs:


Next up is the Packaging. Why not add some branded wallets or boxes to compliment your gift cards and create a memorable gifting experience for your customers.

Similar to above, a member of our in-house design team will be in touch with you to confirm your branding once your order is placed for customised wallets or boxes.

We also provide, generic boxes, bags and envelopes as a lower cost option which can also look fabulous as a gift.


All specification details can be found on our online store.

If you have any questions or need a hand making your order, we’re here and always happy to help 😃


238 views

Get A Demo

Leave your name, phone number and email address and we will be in touch to arrange a demo.

Boost revenue by 62% ?

The gift card solution that costs less and delivers more