How to integrate Voucher Connect with Flipdish

If you have a Flipdish store, you can sell vouchers on Voucher Connect and customers can use them in their Flipdish orders.

To integrate Voucher Connect with Flipdish, you’ll need to get an authorisation token from your Flipdish dashboard.

How to get your Flipdish authorisation token

Step 1. On the Flipdish dashboard, click on your logo in the top right of the screen, and select Developer tools from the drop down menu.

Step 2. Next, click on OAuth Apps, and click on the pink Add New button down in the very bottom right of your screen.


Step 3. Give the app a name, such as Voucher Connect, and click create.


Step 4. Next, click on the app you have just created, and then click on Authorization Tokens

Step 5. You can then create a token by clicking the pink button in the bottom right labeled request token.

Step 6. Flipdish will only show you your token once. We are going to add this token to our Voucher Connect dashboard. Copy it to your clipboard, close the popup and head over to your Voucher Connect dashboard.

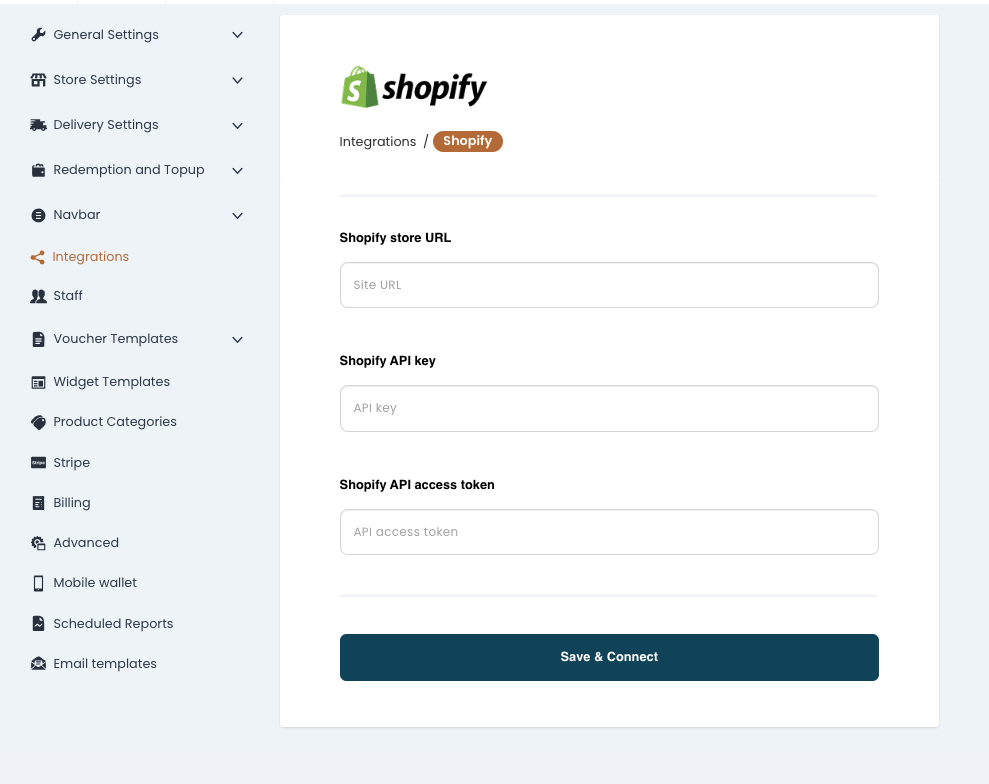
Adding your Flipdish token to Voucher Connect

Step 7. On your Voucher Connect dashboard, click Settings, and then click on Integrations in the sidebar.

Step 8. Find the Flipdish Integration box and set it to enabled. You’ll be asked to input your authorization code. Paste in the code that you copied from Flipdish, and click Save settings. You should see a little message that says “Connection Successful”.


Step 9. In the settings below, Voucher’s are Valid For, you can control what kind of Flipdish orders your vouchers can be used on.

That’s all there is to it. Your Voucher Connect vouchers can now be used by your customers during their Flipdish checkout. All they need to do is enter the code. When a customer redeems a voucher on Flipdish, Voucher Connect will notice and record the redemption in the reporting section.

196 views

Linking Shopify to your Voucher Connect Store


Shopify Link up

First, you’ll need a Shopify account – www.shopify.com/signup

  1. Once your account has been created, you will need to enable the private app development setting;
  2. From your Shopify admin, go to Settings > Apps and sales channels.

  1. Click Develop apps.

  2. Click Create a custom app.

  3. In the modal window, enter the App name and select an App developer. The app developer can be the store owner, or any staff or collaborator account with the Develop apps permission.

  4. Click Create app.

  5. Under “Developer Email”, please enter [email protected]

Next, you need to change some permissions in order to link your Shopify account to your Voucher Connect store;

Looking at the “App development ” section, select “Configuration

We need access to four of these permissions to move ahead – see below;

To allow link up to work, you’ll need to change the above permissions to read:

  • Discounts” – Read and Write
  • Gift Cards” – Read and Write
  • Orders” – Read Access
  • Price Rules” – Read and Write

Once you’ve saved these permissions, we need a few bits to get you linked up. You’ll find this information in the “Admin API” section:

  • API Key
  • Password
  • Shared Secret


Almost there! Head back over to your Voucher Connect dashboard. Select

Settings > Integrations – scroll down to “Shopify Integration


  • From here, you can simply copy and paste the requested details from your Shopify account, along with your Shopify URL and hit “Save
157 views

How to create Tickets and Events

Here we’ll show you how to create, edit and promote your tickets and events.

You have an event coming up and you want to tell everyone about it. Set up tickets to your event and start selling in minutes! 😃

  • Pop over to your Voucher Connect dashboard
  • Hover over Products on the main menu and click Events from the dropdown
  • This will bring you to the Events page. From here you can click Create an event.
  • Up next you’ll need to fill in the details of your event, including name, date & time and description.
  • You can add in a discount or bonus for each ticket sale. This is great way to boost your ticket sales.
  • You will also have the option to limit the number of tickets for sale. This will allow you to control the capacity for your event.
  • Pop in your event image, T&C’s and click Save.

And that’s it, you’re good to go. You can now share the exciting news of your event with everyone.

Sharing your event on social media couldn’t be easier. We have added a Share button that allows to you share directly to your social media sites or you can copy the product link to add to your posts:

To find the share button, click Products and the Share button is located on the bottom right corner of your event product.

If you need a hand with anything, we’re always happy to help 😊

72 views

How to Check-in Tickets to Events


Checking in tickets to your event through the Voucher Connect App?

Your event day has arrived (how exciting 😃) and now it’s time to check-in the tickets you sold. Let me show you how..

The easiest way to check-in tickets is through the Voucher Connect App. You can download our App for free on iOS and Android devices.

  • First step is to login to the app, using your Voucher Connect login details.
  • Click on Redeem from the bottom menu.
  • From here you can open the scanner to scan the voucher QR code or enter the voucher code.
  • The ticket information will pop up next. If valid, you will be able to click Check-in.

And that’s it, this ticket is now checked in to your event.

Just to note, you can view all ticket details through your Voucher Connect dashboard by following the below steps:

  • Pop over to your dashboard.
  • Hover over Products and click Events.
  • Find the event you are looking for and click Details.
  • Here you will find the event and ticket details:

Ticket re-entry

You may want to check tickets on re-entry to your event.

In this case, you can follow the above Check-in steps and the app will notify you if a ticket has already been checked in.

Now to sit back and enjoy your event 😊

If you need a hand with anything, we’re always happy to help!

178 views

How to Limit the Number of Ticket Sales for Your Event.


You might have a capacity limit for your venue or only want to sell a specific amount of tickets for an event. No problem, you can limit the number of ticket sales. Let me show you how..

  • Pop over to your Voucher Connect dashboard.
  • Hover over Products and click Events.
  • You can limit the ticket sales by either clicking Edit on an active event or through the event setup by clicking Create an Event.
  • Next scroll down to the Pricing section.
  • Limit Number of Tickets is the last option.
  • Switch the button on and set your number of tickets.


  • Continue with the setup if you have not already done so or click Save and Exit if you are already finished setting your event up.

You’re good to go now. Your event will become inactive once your ticket capacity has been reached.

If you need a hand with anything, we’re always happy to help 😃

126 views

Get A Demo

Leave your name, phone number and email address and we will be in touch to arrange a demo.

Boost revenue by 62% ?

The gift card solution that costs less and delivers more