This article explain how to add our recommended products to your storefront in just one click.
You want to offer some extra products to your customers but you can’t quite think of an idea or you haven’t had the time to add one to your store, don’t worry we’ve got you covered.. you can now add our recommended products in just a one click!
Let me show you how..
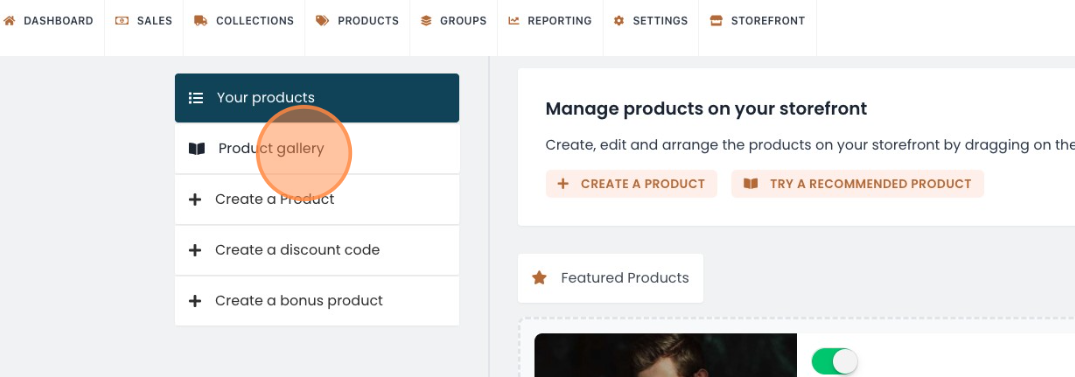
Login to your Voucher Connect dashboard and click the Products tab from the menu.
On the left hand side, hit Recommended products.
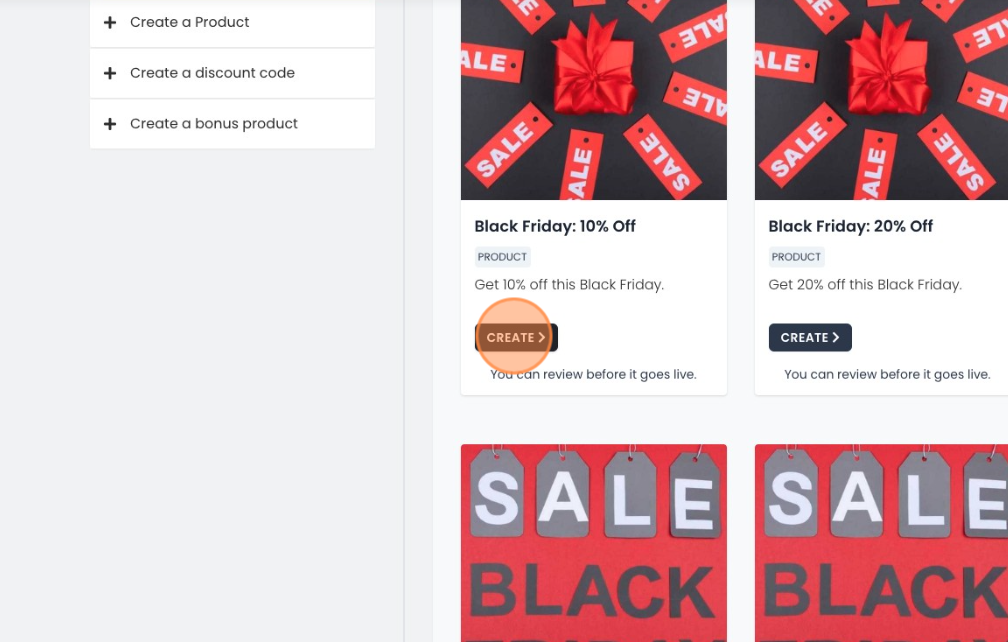
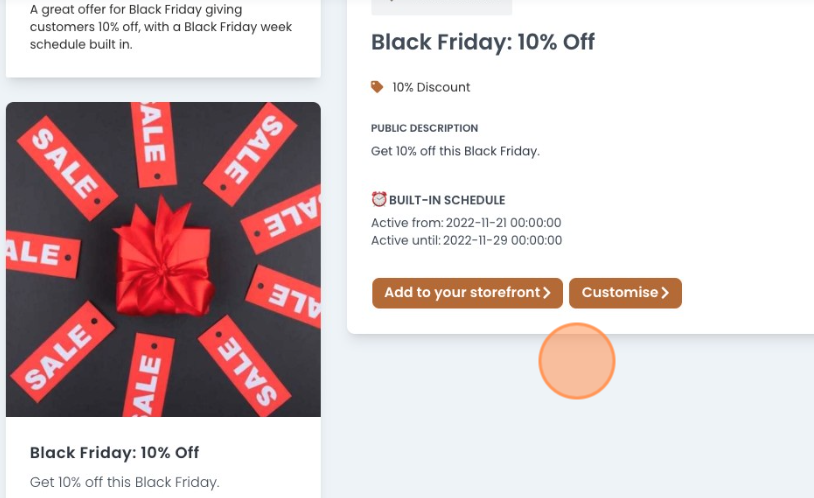
You can then choose to create and add any of the products from the library to your storefront. All products have built in schedules and details which can be customised at the next stage.
If you’re happy with how everything looks, you can add this straight to your storefront by clicking Add to your storefront. It’s that simple! Your product will now appear on your storefront during the pre-set scheduled dates.
If you choose to customise the product, you will be brought to the product setup page where you can change the name, schedule, images etc..
Make sure to browse through our library of recommended products and let us save you the time of setting products up from scratch 😊
We hope this helps. If you run through any issues, don’t hesitate to contact us and one of our team will help you through it.
Ok, so you’ve created your Voucher Connect account – next up is creating your voucher products!
The more voucher products you have to offer, the more options your customers will have to purchase vouchers from you.
Creating a voucher is really easy. Once you log in, you’ll be brought to your dashboard. On the left hand side, hit “Create a Product“
Ok, let’s get your voucher up and running.
Select “New a Voucher Product“
Here, you’ll be given a list of options. Just hover your mouse over each option, this will give you a breakdown of what they mean.
Say for example, you want to create a “Dropdown” voucher – this allows your customer to select from a dropdown of price options.
Give your voucher a name, something short and snappy! You can select various price points you want to include, along with a short description of what the voucher provides.
Next, you can add in a % discount or % bonus amount to your voucher product. This is a great way to boost your voucher sales.
Before you proceed – be sure to select which “Delivery Options” applies to your business. Print, Email (Recipient or Purchaser), Scheduled Email (Recipient), Postal, Click and Collect
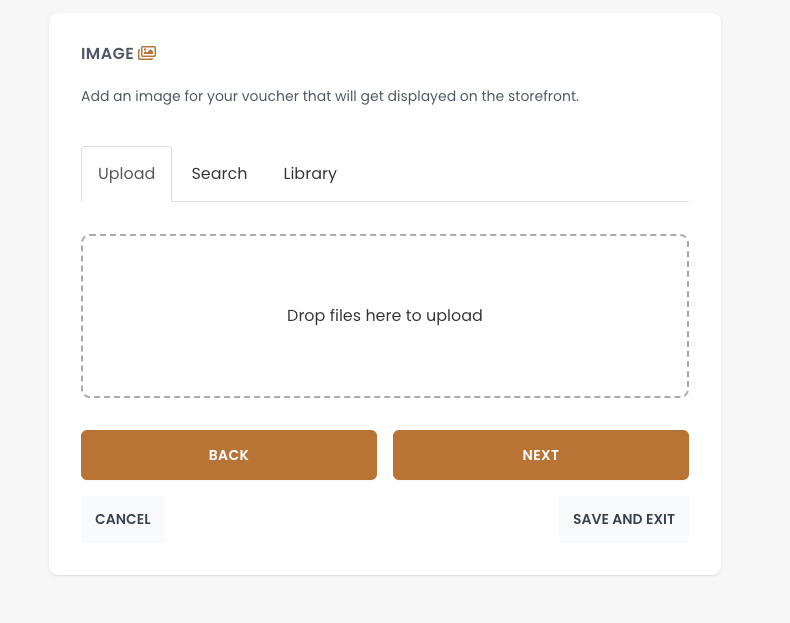
Next, you’re able to personalise your gift voucher. If you have an image you want to use, simply click and upload your file as shown below
Don’t have an image? No worries, we have a huge gallery of images for you to choose from – just click the “Library” button and search. E.g. “Mothers Day”
Ok, your voucher is starting to take shape!
Next, you’ll be given the option to display the value on the voucher – if you’d prefer to keep this private, simply slide this tab to “Off“
You can then choose to add a “Bonus Voucher” – i.e. “Free glass of bubbly with every massage”.
From here, you can select if you want the voucher to be partially redeemable – this allows your customer to use their voucher at different times, drawing down funds as they go.
Finally, on this page, you can input any terms and conditions you want to apply to the voucher. If you leave this blank, your default terms and conditions will apply.
You’ll then be able to set your vouchers visibility options.
Let’s say you’re running a Valentines Day promotion. You want your snazzy new voucher to appear on your storefront from February 1st until February 14th.
Using the “Visibility Controls” tab you can activate this feature. Simply slide the tab across to “On” and you’ll be given this option.
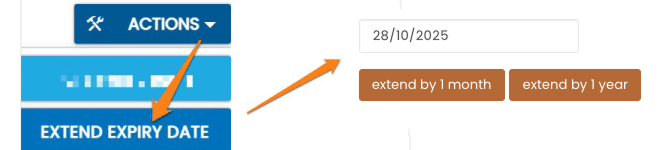
From the “Validity Controls” tab you can control when your vouchers can be redeemed, along with the expiry date.
We’re almost done, promise!
Before your voucher is good to go, you cancustomise your voucher template, using an image of your choosing or from our image library.
Lastly, it’s time to add those final touches.
“Enable Product” means your product is available immediately. If you want to hold off on activating your voucher, just select option “Off“.
If you want to test your voucher out before you go live, “Test Mode” is your man…
Before you finish up, you can ask for a phone number in case you want to check details with your customers.
Last on your list is a nice little touch to “Include Gift Messages”
This is a great way for your customers to add that personal touch to their vouchers.
…and that’s it! You’re good to go!
Simple enough, but if you need a hand with any of these steps – just give us a shout, we’re always happy to help!
Schedule your voucher product or promotion for your voucher storefront.
You can schedule a product or promotion to automatically appear on your storefront during particular dates in a few steps, let me show you..
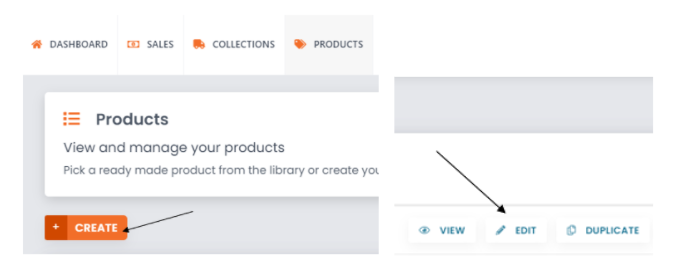
In order to create a product with a scheduled release, go to the Products tab on your dashboard.
You can either Create a new product or Edit an existing product.
If you are creating a new product, fill in all the product information as required. Check out our article on How to create a product.
Or you can click the Edit button on the right menu of the product you wish to schedule.
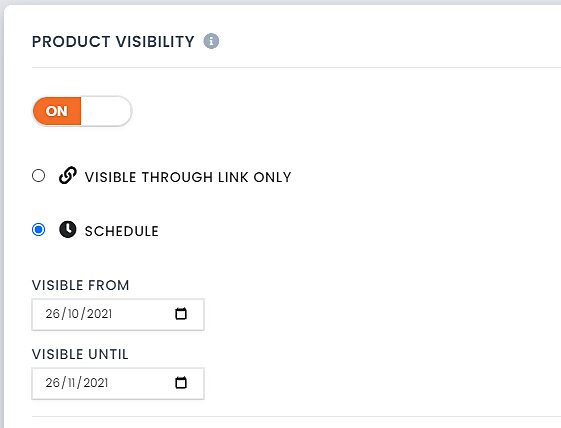
To set the schedule for a product, you can do so on the 3rd page of the product setup. Find the Product Visibility section and click the switch On.
A dropdown automatically appears. Click on Schedule. From here you can set the dates you want the product to be visible on your storefront.
If you are happy with all the other product information, you can scroll to the bottom of the page and click Save & Exit.
You are all set to go with your scheduled product now. This product will automatically appear on your voucher storefront during the dates you selected.
We hope this helps. If you require any assistance, please don’t hesitate to contact us and a member of our team will be happy to help.
This article provides a detailed guide on editing your navigation bar font colour step by step.
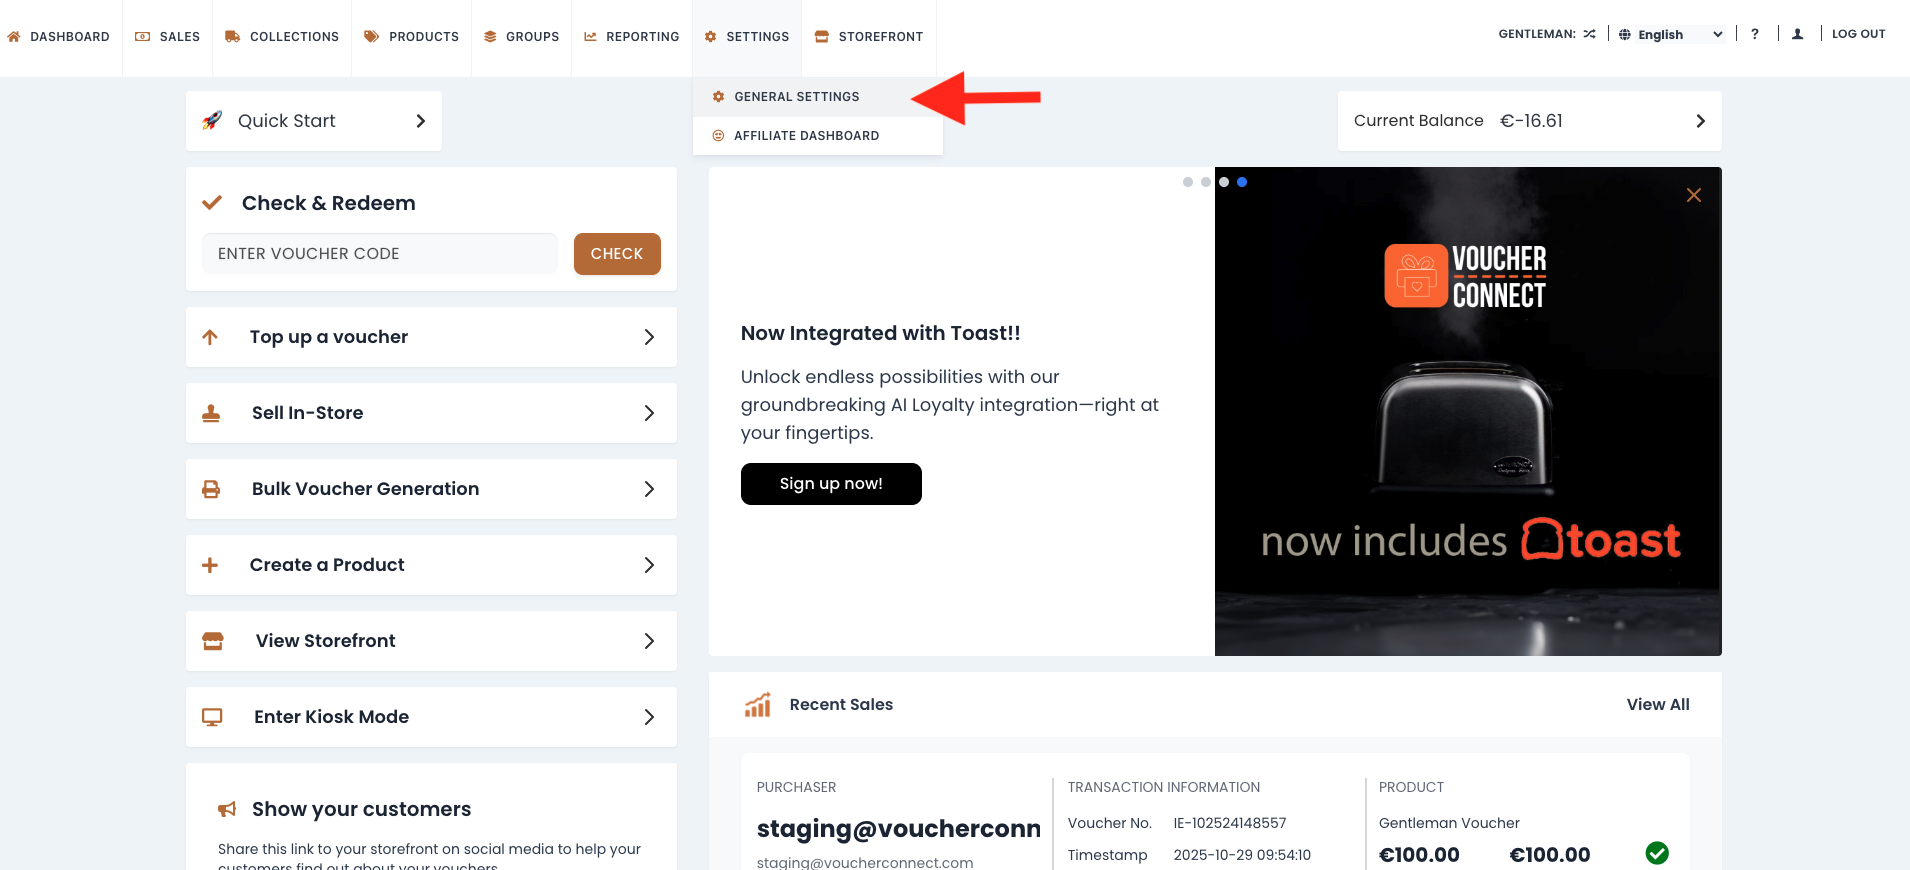
Step 1Go to the Voucher Connect dashboard and click on ‘Settings’ in the top navigation bar. This will reveal a dropdown menu where you should select ‘General Settings’.
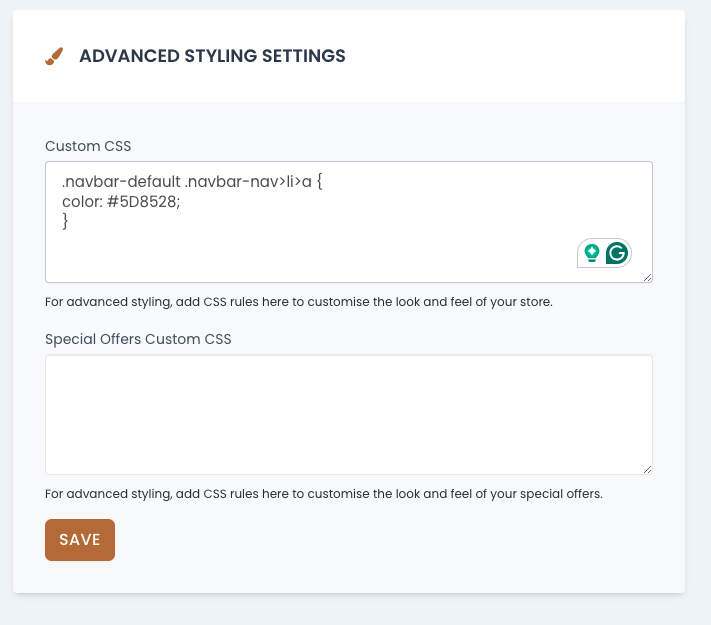
Step 2Navigate to the sidebar and select “Store Settings.” On the same page, scroll down until you locate the “Advanced Styling Settings” section. Within this section, you’ll find the option for “Custom CSS.”
Step 3In the “Custom CSS” section, paste the given code. Be sure to use your custom colour to suit your store best, and remember to save to activate the CSS changes.